Showing posts with label disney. Show all posts

Friday, June 12, 2015

Disney layout

Hi, Donna here today with a Disney layout I did using products you can find at Inspiration Station!
Deb carries lots of products you can use for all your Disney layouts. I don't know about you, but when I scrap Disney, I use lots of white and black cardstock which you can buy in bulk at Inspiration Station. They carry American Craft cardstock in packs of 50, which is great because you save money and it is a good heavyweight cardstock!

For my layout I cut out 9 Mickey heads from the Silhouette Cameo on white cardstock and then hand stitched a border around it. Placing that on top of a sheet of black Cardstock and then laid it on the Patterned paper which is from Moxxie.

Then the fun part begins! I took a couple of the Queen & Co Woodie pieces and Simple Stories and Queen & Co embellishments and placed them around the layout. I just love how this turned out.

 
Here is a close-up of the title from Queen & Co, how perfect and  simple is that? If you look carefully I also took a black fine tip Sharpie and placed dots around each of the Mickey heads.
 
 
Thanks for stopping by today and be sure to visit Inspiration Station for all your scrapping and creative needs!
 
Donna Coughlin

Friday, June 5, 2015

Disney Album Cover

Hi Donna here with an album cover I did for Inspiration Station. Anyone who knows me knows my two loves (after my family of course!) are scrapbooking and Disney!

I bought this album (on sale of course) by American Crafts, it is one of those kinds you have to finish yourself to put my Disney trip from 2007 in this album thinking I would do the cover....8 years later I finally put my mind to it.

I used a combination of Simple Stories Magic, Queen & Co Magic and Moxie Magical Memories papers and embellishments.  I only use 3 ring binders and since I scrap so much, I use a lot albums! I try to get them on sale or discount whenever I can and since I am not picky about the albums I get whatever I can.

First thing I did was use acrylic paint the brown fabric part with red the rest of the album in black. Looks  Disney like already!

 
I made the "Disney" title and the Mickey head shape on my Silhouette. Anyone who wants these svg files, shoot me an email at dscog@verizon.net and in the subject line put Disney SVG and I will be glad to share them with you!
 
I used ModPodge to apply everything.


Close up of the Queen and Co woodie pieces, they are so adorable. I just used some ink and the imagine sticker is from Simple Stories.


I always mark my album sides so when they are on the shelf I can identify what is in the album. I used a Simple Stories tag, a button and Queen ad Co stickers. After I was finished I applied another coat of Modpodge to help seal in the paint and to keep the paper secure, (except for the wood pieces I added them after)


Inside the album cover I made a pocket to put in all my Disney papers, maps, etc I saved because what else do you do with them? The Mickey head is another SVG I have.


Close up

Another close up of the pocket

 
I had so much fun doing this, I want to get more of these albums! Thanks for stopping by and be sure to visit Inspiration Station for all your Disney needs!

Donna

Sunday, February 2, 2014

California Adventure

Here is the start of many pages done for Disney's California Adventure! I hope you enjoy them.

First stop, rope drop for  Soarin
Mater's Junkyard Jamboree

 
Meeting Lightning McQueen and Mater


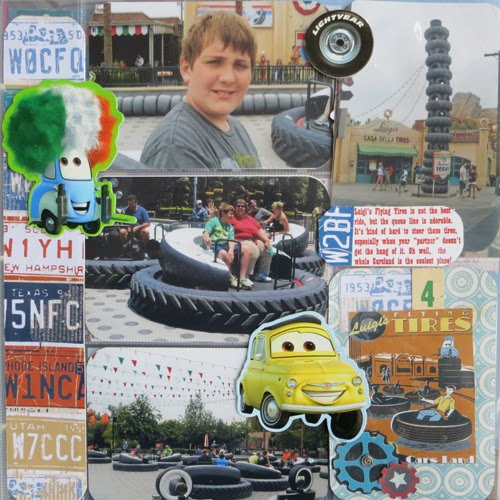
Luigi's Tires

The best ride ever, Radiator Springs


Carsland at night, awesome!
\
Cool retro signs everywhere!

Thursday, March 15, 2012

Momenta

This layout I made using the fabulous Momenta Endless Summer Paper Pad. I cute out the "waves" and layered them across the bottom randomly. The title and all the embellishments were in my stash, and the anchor I made using my Cricut.

Thursday, July 22, 2010

Banners are hot this year.

Gotta love banners - they are hot this year and everywhere!
This is just the cutest picture of Jeffrey and Donald.
Over at Scrapgal.com blog http://thegalblog.blogspot.com/ one of the challenges was to see how many manufacturers. This one has ten that I wrote down.
American Crafts green cardstock
Jillibean Minestorne Thin Zucchini
Sassafrass Lass lined paper and cardstock stickers
Scenic Route Liberty
Pink Paislee Sun Yellow Solid/Gingham
Chipboard (manufacturer ?)
Making Memories border
Dream Street Rubons
Making Memories Just Chillin Layered chipboard stickers
Ek Success Mickey Button

Saturday, May 29, 2010

Golf Carting

Here is a layout I did while in Fort Wilderness we rented a golf cart, we had a blast driving around it in, especially at night. Since it was near Christmas people had their golf carts decorated for the holidays, plus so many of the trailers were decorated. What a treat that was! Next time I hope to go there at Halloween, wouldn't that be fun!

Friday, September 5, 2008

Getting to the end

Of my Disney pictures! Only 5 more to go! I am hoping to finish up 2007 pics by the end of this year, but it's October already! Where did the year go. Here we are in Epcot's Germany pavillion.

Tuesday, February 19, 2008

MY CRICUT DESIGNS


Here are some creations I made using the Cricut design Studio. They should be paying me royalties for promoting this product, but I LOVE it!
The above is what you see on the screen before cutting. I made this by just using circles and welding them together. The dark lines are what will cut.
The top one I used a rectangle also. The great thing is you can save these and use them over and over again and you can share them with your friends!
This is something I made for a layout, I used different cartridges and welded the word Family together.
This one I used three different cartridges and welded them together.

This one 3 different cartridges also, But I took the fishing line and welded it to the F and the N, so when you see it up close , it looks like the fishing line caught the letter F! Then I added fonts to the boat. Love it!

The word Happy - Just using the Cursive 101 Cartridge and welded them to make one word.


My finished Valentines day card, on the left is what you see on the computer, I love the fact I could design all my elements- make sure they fit and then print them out. Also used a lot of different fonts. You can also, reshape and resize things with ease!
This one I love, it's actually larger, but I blew it up so you could see, I took a star and outline star and kept repeating the pattern make a boarder.


Finally my first creation I took and oval for the crabs body, half moons for the claws and the letter I for the eyes and welded them all together to make this crab. The waves also, design studio! You can see this one in my layouts I have posted down below! Thanks and please leave a comment letting me know what you think!