Showing posts with label mini album. Show all posts

Wednesday, June 22, 2016

Harry Potter mini album using Club Scrap Hypno papers.

Welcome to the Club Scrap Artist Team challenge blog hop. This is your first stop after visiting Club Scrap Blog and saw what the very artistic Karen created with the Hypno kit!

Today I would like to share with you a mini album of a recent trip to Universal Studios and the pictures from the Harry Potter parts of the parks. Bare with me ALOT of pics! All paper unless otherwise noted is using Club Scrap Hypno papers. And I used so bits of my stash I will try to note that as well. These papers are a lot of fun!


Here is the cover, the name I got from one of the books Harry Potter used at school. I used the Creative License Lite Silver D-Rings and Screw Top Brads and the stars from the Boardwalk Wood Veneer Tags and Stars which I painted black. The D-rings and the metal glasses I used embossing powder on them to make them black. Those glasses I had in my stash forever, and finally used it. I think I got it from a CKC show. Each tab of the book I used Moxxie Harry Potter paper which had  words Harry used with his spells. Also on the cover Tim Holtz Key plate and bottles.

 
Closeup of the closure, added metals charms to the chain. As you can see each page has a tab with a magically word from the Harry Potter books on it.


The "Eye of Newt" bottle I made by painting the bottle black, then added silver glitter paint on top. I then took Tacky Glue and very tediously painted the eye and the word Newt. Putting on several coats and let it dry completely, I took some white Ranger crackle ink and went over it again. The other bottles are filled with purple glitter and green micro beads.


 Here are some of my favorite pages from the album!
 
 This picture is of the castle ride, and opens up to reveal more pictures! This is the only place I used a Moxxie sheet of paper. See next photo for the unfolded pictures. I think the chipboard piece at the bottom is Bo Bunny.

 
To create this page, simply folded a paper in four and add photos, this is a super easy way to add lots of photos.
 

Here is the train station, this place was huge! I used the Hypno papers as well as 7 gypsies Ephemera and Moxie sticker.

All the luggage waiting to be put on the train, even Harrys owl was waiting.
Transparency is Tattered Angels transparency but I backed it with the back side of the Hypno paper.


More pictures of the train. The ride was totally awesome, just so different and if you are Harry Potter fan you have to go there!  Train sticker is Crate Paper I think, and 7 Gypsies Ephemera.


The Hogwart Express finally arrives! The train takes you from Universal Studios to Islands of Adventure, which is awesome way to get there, you don't have to walk through City Walk to get to the other park.Again I used a Tattered Angels transparency.

The is in Diagons Alley, every 15 minutes the dragon on top of the building spits out fire, pretty cool. The tag I made using blank chipboard covering them with the Hypno paper and used Moxxie rub on's.


And finally my OBSESSION with BUTTERBEER! I totally love this stuff. Every time we go I have to get two of them (at different times of course!) My husband doesn't get it but then I am sure all scrapbookers understand obsessions! The obsessed sticker I found in my stash and was perfect!

 
Products Used:
(other products mentioned above)
 
Thanks for stopping by and your next stop is the super talented Lisa's Blog!
 
Donna

Wednesday, March 12, 2014

Travel Mini Album

HI, Donna here and I am excited to share this paper bag mini album I made using the new Baggage Claim line from Quick Quotes. I made a video that is below to show you all the pages but here are a few of my favorite. Here is the cover,

 I made those tags from leftover pieces.


 There is a mini album to put in my mini album

You can even add things in between the pages.

My last page I made a travel log that opens up into a flap album.

Here is the video, I hope you enjoy it. Please forgive me, this was my first ever video, so if I sound nervous, and I was!
 
Thanks for stopping by!
Donna


Tuesday, February 25, 2014

Travel Mini Album

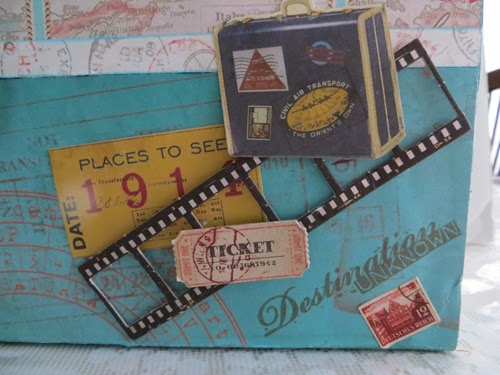
Hi everyone, Donna here today I am excited to share with you a new line from Quick Quotes called Baggage Claim. With thoughts of vacation on my mind, I made a  mini album, which I will share with you next time, but I wanted to show you this cute little suitcase that will hold  the mini album. Isn't this line fabulous! I just love this line but what else is exciting is the new 12 pack of Powderpuff Inks with all new colors, and they match this new line perfectly!

The handle is from an old purse which I cut down to fit this project and used super glue to hold it securely. I found some other embellishments in my stash that I added to the front.

 
 The film strip, ticket and stamp are all from the Baggage Claim chipboard and sticker packs.

 
 My mini album will have lots of pockets so I added some extra places inside the suitcase, like the pocket on the cover to put in tickets, maps, passport, whatever. And there is also a panel underneath. Just pull the ribbon tab up.

 
Under the secret panel, is another place to store papers or a mini log.

 
Inside is a travelogue to put underneath.

 
Place to keep notes or add some more pictures.


Here is a sneak peek of the mini album I will share with you next time!


Products Used on this projects:
Quick Quotes Baggage Claim papers
Quick Quotes Baggage Claim Chipboard
Quick Quotes Baggage Claim Stickers
Quick Quotes Powder Puff Chalking Inks
Misc embellishments
American Crafts Paper for journaling pages
twine
7 Gypsies Travel stamp set
Glimmer mist acrylic pieces


Thanks for stopping by Quick Quotes today and be sure to check out the new line here!

Wednesday, April 11, 2012

Boys Rule!

I am so honored and thrilled to be the guest designer over at BoysruleScrapbook.com. The kits are super fantastic, but this months kit totally rocks! The paper is Simple Stories Awesome which anyone who has a boy has to have this kit. Plus you get so much, not only did I make this mini album from the kit, but I am making 3 layouts which I will share with you later this month. Please go over and check out the kits and of course the talent! She also has a monthly contest. All you have to do is link up a layout made from the sketches provided. I cannot say enough great things about this site!
I made this mini album for my son to put in his friends school pics he received. On the back which I didn't show is a spot for autographs.
Don't forget to visit Boysrule


Sunday, February 5, 2012

Momenta Great Outdoors Kit - My mini album


Here my first project as part of Momenta's D-Lite team using the Great Outdoors Kit. It is just the best kit for any kind of camping or fishing layouts you want to make. The sign "charms" were made from a piece of paper from the kit that had outdoorsy signs on. I cut them out and applied them to chipboard, and coated it with Modpodge. LOOOVEEE IT!

Momenta Camping Icon Stickers
Also some misc brads, Modpodge, blank chipboard, ribbon, braiding cord, pins.
I made those cute signs from the paper included in the kit.

The pocket on the bottom was a sticker I backed with some a piece of scrap paper and glued the bottom and side. Tabs were made using the puffy stickers included with kit, cute huh?
Also can use tags to make a pocket, like I did below.
Go crazy! Add extras everywhere, even in between pages like I did here (the North East is just a tab I glued in.

In case your wondering here is how I made the mini album. I had this accordian file in my stash, I painted the edges of what will be in the inside of the album, no need to do the outside, since it will be covered with pp. Also here is a great secret, inside of just using pp to make a tab to bind the mini album, I use mailing envelopes on anything that will get used a lot. You know the kind of envelopes, the ones that can never rip or tear. I think Avery's brand name is Tyvek. This makes a great tab. Since I have a 4X4 album I cut a piece 4x2 1/2 of the envelope and 2 pieces of pp the same size.
To make the pockets I glued the bottom and inner side panel and used clothespin to hold them together.