Showing posts with label Club Q. Show all posts

Thursday, June 11, 2015

June Club Q

Hi, today I would like to show you a layout I created with the new Club Q from Quick Quotes.
Look at all you get in the Ultimate kit!

 
Here is a layout I created using items from each of the kits. The laser cut chipboard and papers are fabulous! I especially loved the round globe with the saying What a Wonderful World which I covered with the delicous Creamy Cocoa and White Coconut Powderpuff Ink.


Here is the chipboard luggage included with the kit. I inked it with the New Powderpuff ink called Creamy Cocoa and then with the scraps of the Gypsy Road 100 I cut from the postage stamp side little words and pictures and used ModPodge to adhere them. For the smaller piece of luggage I used the brads from the kit and wrapped two pieces of twine around them.


For the luggage tag I used the another scrap to cover it and then added a chipboard piece to it and inked the edges with Midnight Confessions ink.

 
Products Used
Other products: twine and Modpodge

Thanks for visiting today, and be sure to check out this month's Club Q!
Donna Coughlin

Thursday, May 29, 2014

Quick Quotes and Xyron Blog Hop

Hi everyone,  Quick Quotes and Xyron have teamed up to have this blog hop, hope you all had a great time checking out the design teams creations. I made this layout using Quick Quotes Club Q kit and my favorite adhesives from Xyron.

I had some flowers left over from Club Q but I cut more out. To get this affect I dabbed ink on them first using the Powderpuff Inks, the new Caribbean Blue and Very Berry. Then mist the flowers with water, the causes the inks blend together. Next you crumble up the flowers into a little ball, sounds crazy, but once you open them up it gives them a really neat look. Then just layer more flowers on top, as many or little as you want. Just add a brad or some bling in the middle and your all set.


My four favorite and go to adhesives are 1. The Xyron Mega Runner, which I use all the time on pictures. 2. The Xyron Glue stick is great for paper,  3. I use Xyron tape runner for pictures and ribbon. 4.Finally the new Xyron X sticker maker. Let me tell you about the Xyron X sticker maker shown below. The re-designed shape works wonders. You can now get those little pieces into the sticker maker so much easier, also it seems wider, is this my imagination? But also because of the new design there is less waste after you pull you paper through. Totally lovin' this new design. There is also a bigger sticker maker that I use for large die cuts.

Products used on this layout.
Want to Scrap bling
Misc. embellishments


Thursday, December 26, 2013

Quick Quotes Club Q Double Page

Hope everyone is recovering from the holidays! Donna here today to show you a double page layout I made using Decembers Quick Quotes Club Q kit. The layout sketch that is included with the kit is amazing, but I decided to twist things around a little. To start off with I took the two rosettes putting them together to make a larger one. I really like how it added another layer. Also on the back of the fabric flower I tore off the leaves and put them so they stuck out a little more. Also I cut to out two flower shapes and layered them underneath the fabric flowers. Instead of using the fiber I used white lace to hold my two pieces of cardstock together. Inka gold rub is fabulous to cover the Quick Quotes chipboard and especially looks great with the colors in this kit. Be sure to check out the Ultimate kit this month, it has everything you need for your Christmas projects!

Products Used:
Quick Quotes Club Q December kit
Quick Quotes Birthday Bag O' Chips
Queen & Co Marble Rox - Tada
Craft store miniature wreath
Inka Gold Metallic Rub

 
Thanks for stopping by Quick Quotes and looking forward to spending 2014 with everyone here at Quick Quotes.

Donna

Monday, December 16, 2013

December Club Q - Holiday Bags

  Hi all, Donna here to share with you a few holiday gift bags I made. No more running out to buy a bag at that last minute for a gift. Why not try making your own! These are a lot of fun to make, not to mention this month kits are fabulous! The Altered kit comes with a kicker project which is fabulous, but I decided to use the Laser Dies cuts to make three very different bags. To start off make your bags. There are tons of tutorials out on the internet on how to make bags, just Google how to make a gift bag. The instructions are pretty much the same, and you can find a video or written instructions, whichever you prefer. I used two sheet of scrapbook paper taped together, and the size is about 7x11.

  The Merry Christmas bag I adhered the die cut onto a sheet of red paper and edged it with faux snow. I also had these ugly looking plastic snowflakes, which I don't know why I never threw them out, but I painted them white and adhered the same snow and they look fabulous now. I used the Quick Quotes North Wood papers from the Option B kit, finally I used the ribbon from the Altered B kit.

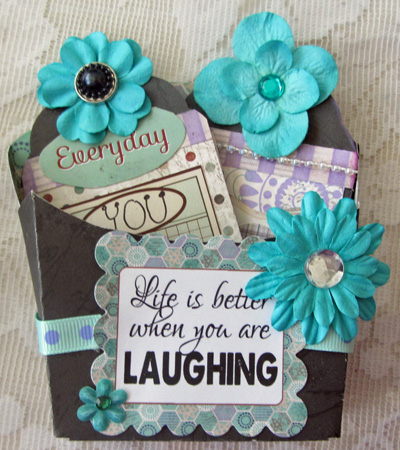
  The Gift of Family bag was made from the new Quick Quotes Happiness papers. The rosette is from the Option A Double page layout kit which I enchanced with the Quick Quotes Powderpuff ink - Coconut, the stickers are also from the Option A, which by the way, in that kit you get a whole sheet of the Cracklin Rose Stickers, the handle was made from the fiber in the Kicker set, this string like material is fabulous because it is stiff so you can alter it to almost any shape you want. Finally it was embellished with different Christmas items.

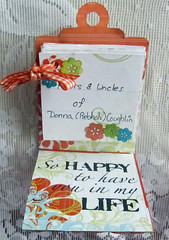
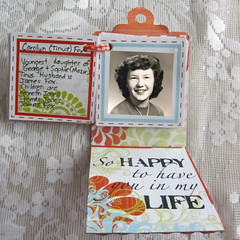
  The final bag, Santa's Helper, was also made using the new Happiness line, with all items used come from the Option A kit, except the ribbons, and the Die cuts and paper clip which came from the Option B kit.

 Products used:
Faux Snow
ribbon
 Misc. embellishments
 
 Now off to make more bags! Also I would like to wish you and your family a joyful holiday!
  Donna

Thursday, October 10, 2013

Funny where inspiration comes from


Hi Donna here with a layout I did with the October Club Q kit. It is funny when and where inspiration strikes for a layout. As usual when I get the kits I pull it all apart and look at the pieces. I saw this tiny little acorn and that was it, and being in Disney mode for scrapping, Kaboom - I knew exactly what I was going to do. What inspired you to do your last layout ?


I loved the piece from the Page Layout Option A kit with all the blocking (first page of the double page layout) and I knew that would be great for my pics, but the word Autumn wouldn't work. But the  I saw the journaling piece from the 2nd page of the kit, cut that out and it fit perfectly into that space where the word Autumn was. To help make the photos stand out I took the borders from the kit and added them to top and bottom, also a perfect fit! The red plastic ring also fit as did the scalloped circle at the top. The colors in these kits are not only great and modern for Autumn layouts, but you can use them for just about anything!


Here is a closeup of the flower cluster. I added a little bit of Java Powderpuff ink around the leaves from the Altered kit to help them stand out a little. When I had them there without the ink they kind of got lost and didn't really look like much of anything. And a little bling is always good!


Product used:
Quick Quotes October Club Q Altered kit and page layout kits
Quick Quotes Powderpuff ink - Java
Jolees Boutique Flocked domes
EK Success Chip and Dale Stickers
Misc flowers


Now hop on over to the Quick Quotes store and check out this months great Club Q kits!

Thanks
Donna

Wednesday, July 17, 2013

July Quick Quotes Club Q kit


Today I like to show you a canvas I made with Quick Quotes Club Q Altered July kits. These kits are so packed with fun laser cut die-cuts that the possibilities for these kits are endless. There are instructions but if your like me I like to toss them aside, pull everything out of the kits and see what I can create with it, and this is what I came up with. I decided to tear some paper and layer it. I also inked the edges of the frame with Quick Quotes Mocha Mama Powderpuff Ink. Finally before putting a layer of ModPodge on I added some word definitions from an old dictionary, if you look closely they say love, music, harmony, also brushing them with a wash of diluted paint. For the birdcage I put a thin layer of gesso  and then coated it with a thin layer of gold. I used the reverse side of the canvas so I could leave a hole in which I bent the bird slightly to fit the hole I left behind. For the bird I used Quick Quotes Red hot Powderpuff ink and added some gold highlights. 

Before applying Modpodge, the edges where I ripped were white and I wanted them to look more vintage. So what I did was dip a paintbrush into brown paint, and then swoosh my brush around in a little bit of water to give me a wash, I then proceeded to put a layer of watered down paint all over the paper and I love how it created this effect on the edges.


Products used:

Quick Quotes Club Q Altered July kits
Quick Quotes Mocha Mama Powderpuff Ink
Quick Quotes Chipboard Bird Cage
Quick Quotes Red Hot Powderpuff Ink
Recollections Flower
Heart pin
dictionary words
Modpodge
Gesso
Thanks for visiting Quick Quotes, be sure to check out the Club Q kits this month, if you haven't already.
Donna

Monday, April 22, 2013

Quick Quotes Mania

Hello everyone! Today I wanted to share with two projects I made this week. This first is this layout using the Quick Quotes 6x6 Dusty Road paper pack. The word is triangles are the new trend, and 6x6 pads are so much fun to use for this technique. I found an awesome sketch which I use for the foundation of my layout over at Scrapbook Friends. Just cut lots of triangles in different sizes and place them on your layout. All the paper was from the 6x6 pad except the flower which I made at a Quick Quotes Super Weekend class, you can find about it here! On a side note the class was so much fun, I got so many layouts done in one day! The best part was it taught by Patsy Gant who is just the sweetest person. The pearls and brads were leftover from the Aprils Club Q kit,

Products used
Quick Quotes Summer Breeze 300 
Quick Quotes 6x6 Dusty Road 
Aprils Club Q kit, pearls and brads
Ink


My second project was this cute little fry box from the Quick Quotes Club Q Option B kit. I altered the tags and instead of making a mini album with the tags, I used them to make a gift card holder and a card for a special friend who always is there for me and makes me smile everytime we are together. I think I will throw a small bottle of her favorite lotion in there too!
Products used for this was
Quick Quotes April Club Q kit Option B
Quick Quotes 6x6 Dusty Road Paper Pack
Flowers
Ribbon
Gems

Here is the gift card holder which was so easy to make, using the brad attach two tags and decorate! The Dusty Road 6x6 paper pack made it a snap to decorate.As you can see it swings open to reveal a gift card. Just attach your gift card with a glue dot.

 
Lastly, here is a card that I used two tags and attached them on the side.
 
Thanks for stopping by Quick Quotes and if you get a chance visit my blog to see more creations using Quick Quotes!
 
Donna


Wednesday, January 16, 2013

Quick Quotes Club Q January Kit

Wow what a way to start of my first month with Quick Quotes! These kits are beautiful and so versatile. Let me tell you a little bit about my project. With the passing of my mother my son had lots of questions about all my aunts, uncles and cousins he met at the funeral, many for the first time. So I made this cute little mini album using a combination of  two of the January kits, the Premier Altered Kit and the Premier Page kit, and the Quick Quotes  Limeade and Blue Hawaaiin Powder Puff inks. Each page has an aunt or uncle, with the names of their spouse  and children.

The front cover I deconstruction a lot of the parts in the two kits and used some of the die cuts included in the kit and used Powder Puff inks to color them. These inks match the kit colors perfectly. The bow on the ribbon also helps keep the book closed.
 
 The kit contained a perfect sheet of paper that had 3x3 inch squares that I cut out and glued back to back. I punch a hole in the corner and used the ribbon from the kit to tie them all together


Here is what one of the pages looks like on the inside.
 
I hope you enjoy this mini album and drop me a line if you make one too, I would love to see it.
 
Donna